Jeff
Restoring an old road bike
Buying the bike
When I got this bike, it was in pretty bad shape. It had been stored in a shed for years. At that time, I didn’t know much about bike brands, groupsets, or frames. I just wanted to rebuild it, learn along the way, and hopefully make a small profit to buy something new. When I first got it, it couldn’t move because the tires were flat and the steering felt shaky. But hey, just look at those colors!


After spending some time researching, I found out that it was a simple entry-level bike from the 80s, a replica of the Panasonic Cycling team. This version, called the Aerospace, had some cool aerodynamic details like the dented seat tube and aero bottle (which was unfortunately missing). But surprisingly, everything else was in better condition than I expected. Nothing had been changed or replaced, and all the parts were original.
Taking it apart
Here’s where I faced my first challenge. I had some tools, but not everything I needed, especially bike-specific tools. So, I had to buy some tools before I could start restoring the bike. I made sure to keep my iPhone nearby to take photos of everything I took apart. This came in handy later when I was putting it back together. Here are the tools I bought to get started:
| Tool | Price |
|---|---|
| Crank puller | €5,00 |
| Unior 1670.2/4 (cassette removal) | €8,27 |
| Cone wrench 13/15/17mm set | €6,99 |
Cleaning & Polishing
To make this bike look new again, I used dish soap, Turtle Wax, brushes, and lots of WD-40. I cleaned every part thoroughly before putting it back together. This part was more enjoyable than I expected. Just take a look at the before and after photos—it’s like magic!


New parts
It was clear that I needed to spend some money to make this bike look new again. The tires were completely dried out, the chain was rusty, and the bar tape was starting to fray. But apart from that, it looked good to me. My goal was to keep it as close to the original as possible. I’m not a fan of repainting, mixing groupsets, or adding accessories that weren’t available back then. Here’s what I bought:
| Parts | Price |
|---|---|
| Elvedes gear cable set | €13,65 |
| Elvedes brake cable set | €11,60 |
| KMC chain Z8.3 | €11,75 |
| Michelin Dynamic Classic tires | €21,58 |
| Michelin Airstop 700x25/32C Presta | €7,98 |
| Bike Ribbon Cork Bar tape | €7,99 |
| New outer brake cables | €6,99 |
| New saddle leather | €6,99 |
The Rebuild
The most enjoyable and challenging part was putting it all back together. As a father of two, I took it one step at a time, making progress every evening and weekend. All the work was done in my small garage. Yes, sometimes it was a bit of a puzzle, like figuring out how to reassemble the derailleur. But the photos I took while taking it apart were a big help. Another important step in the rebuild was greasing everything again—every bolt, bearing and moving part needed lubrication. By doing this, the bike would run like new again and be protected from rust. Here are the different lubricants I used:
- Copper grease
- Bearing grease
- Bike oil
- Chain wax
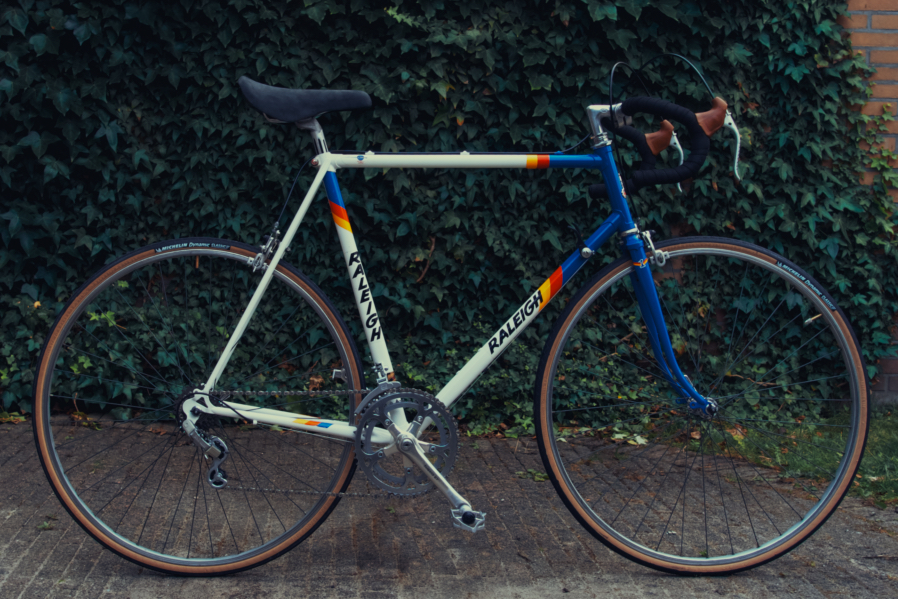
And there you have it! I’m pleased with how it turned out. The bike is now completely rebuilt and rides smoothly. I almost decided to keep it, but unfortunately, I didn’t have enough space in my garage. So, I took some photos and listed them on Marktplaats (the Dutch version of eBay).
Total costs & profit
Now, let’s see how much I spent on this project. I didn’t include delivery costs or expenses for tools in the final sum. In total, I spent x on new parts. I listed the bike for €225 and after +- 2 weeks sold it for €175.00. Which makes a small profit of €86,47.
Conclusion
So, to sum it up, this project wasn’t just about fixing a bike and making some money. It started as a way for me to learn more about bike mechanics. There’s something incredibly satisfying about rescuing a bike from the scrap heap and giving it a new home. Plus, knowing it will keep rolling for years to come is even better. This steel beauty is now ready for many new adventures.